
(As an Amazon Associate, I earn from qualifying purchases.) Additionally, I am not a doctor or health physician, and the advice given here should not be used in place of professional medical advice. Please do your own research.
Compost is like a gardener’s magical secret sauce! Many people buy commercially made compost for their gardens, which is very useful, but why stop there?
You can take every bit of scrap and waste from your day-to-day life and make your own compost at home!
And it’s very, very important that we, as a whole society, relearn how we process our waste.
As of now, the world throws away about two billion metric tons of solid waste per year. (And please DO check out the link!!)
That is an obscene amount to waste, and we are destroying the Earth’s ability to support life by doing so…
If we learn to add as much of that waste as possible back to nature’s recycling system by composting it instead, how much better could we make life on Earth today? How much could we create positive change for a cleaner and healthier future?
We have to try, and we have to succeed… so let’s talk about compost. Turning organic materials from the form they’re in now to another usable form… I can’t wait!
So, let’s dive in now with what compost is, why it’s so important for your garden, and how you can change your household waste into compost asap!
What Is Compost?
Compost is a material that is made when organic things are broken down by microorganisms, changed from the form it had when living (think banana peels and eggshells) into a brown, spongy, soft material that is essential for plants to live in and get nutrition from.
Compost is not rot. Compost is not dirt. It is soil… Jam packed with nutrients that are made bioavailable to the plants, funguses, and microorganisms that live in the dirt and need these nutrients to thrive!
In an ecosystem, compost is made when plant parts (old roots, fallen leaves, fallen tree trunks, seasonal plants), animal waste and leftovers (manure, egg shells, insect exoskeletons, corpses), and any other living thing that has reached the end of its life or living use, is broken down by bacteria and other microscopic organisms in the environment to be used again in the circle of life.
This organic material is constantly cycling through an ecosystem… it is the foundation that supports life in an ecosystem!
How Does Compost Help a Garden?

How the organic elements of an ecosystem keep the whole thing running is complex, but I’ll try to boil it down to the sweet and simple!
(Organic in this context means anything that was once a living organism.)
Compost is made by breaking down organic material – especially plant-based materials. It powers a living ecosystem in two important ways. One, by creating structure in the soil, and two, by maintaining optimal moisture levels in the soil.
Dirt, which is not alive, is made up of finely ground minerals and rocks. Dirt needs organic material to support life. Compost is the organic, life-supporting, spongy, structural element that transforms dead dirt into soil.
Organic material keeps the ground soft, providing structure and keeping it from becoming compacted. This means tiny air pockets form under the soil surface and make it possible for aerobic (oxygen dependent) chemical processes to happen.
The open soil structure and airways in the soil are also important because they give tiny insects and microorganisms a place to live, move and feed. This life teeming below the surface of the earth unlocks and balances the nutrition that feeds growing plants!
Organic material also acts like a sponge, allowing water to cycle through the soil without getting stuck and pooling up. At the same time, water is absorbed into the organic material itself, to be released slowly back into the soil over time. This keeps conditions damp (without being saturated and boggy) or drying out.
This way, the plants and other life living in the soil do not dry out and die, or drown and rot.
How to Make Compost
Making compost is really simple! You just pile together the ingredients, and let nature’s processes do the rest!
Of course, if you add some technique and know-how, you’ll enjoy a steady supply of rich, well-made compost that’s ready for the garden on a dependable timeline.
This is how you do it….
Ingredients for Successful Composting
To get started composting, you’ll need to gather materials and decide where you want to locate your compost heap.
It’s helpful to have a bit of a stockpile to start off with, but even a small amount of material will be enough to start out!
To get started, you’ll need:
- A location, contained or not, to start your compost heap
(if you want a container, purchase or make one – more on that below) - “Browns” – carbon-based, woody, dry, or fibrous materials
- “Greens” – nitrogen-rich, green, fresh materials
- Water
- Air
Browns vs Greens: What They Are and How they Work in a Compost Pile
It’s important to understand the difference between the “brown” materials and “green” materials that you add to your compost.
Brown materials are carbon-rich, and that carbon provides the energy needed by microorganisms to break down the organic materials.
Also, the browns are usually tough and dry, so they are able to absorb the water in the green materials, keeping the pile damp and spongy.
The green, nitrogen-rich materials add the nutrition microorganisms need to thrive as they break down the organic materials. Greens are usually softer, fresher, and faster/easier to break down than the browns.
(It’s important to understand the carbon vs nitrogen element because the color of the materials don’t always correspond to their chemical composition. A good example is manure, which can be a variety of colors, but is considered a “green” in composting because it is high in nitrogen.)
Balancing Browns and Greens in Your Compost
You’ll need more browns than greens in your compost pile.
Different folks have different advice on the exact ratio, but if you have at least a 50/50 mix, your pile of organic material will become compost. A popular, more exact ratio is 25:1 to 35:1.
What this looks like in practice is: fill your compost heap about 1/4 of the way full with browns, and then add a thin layer of greens on top of the browns, and then keep alternating using those amounts of browns to greens, roughly.
Whatever the exact ratio of browns to greens you use, it’s important to have both, with more browns than greens.
Brown materials to add to your compost heap include:
- Straw or hay
- Twigs, sticks, wood chips
- Brown, unlaminated cardboard
- Dried leaves
- Pine needles
- Dried out, tough and woody plant materials like corn stalks and cobbs
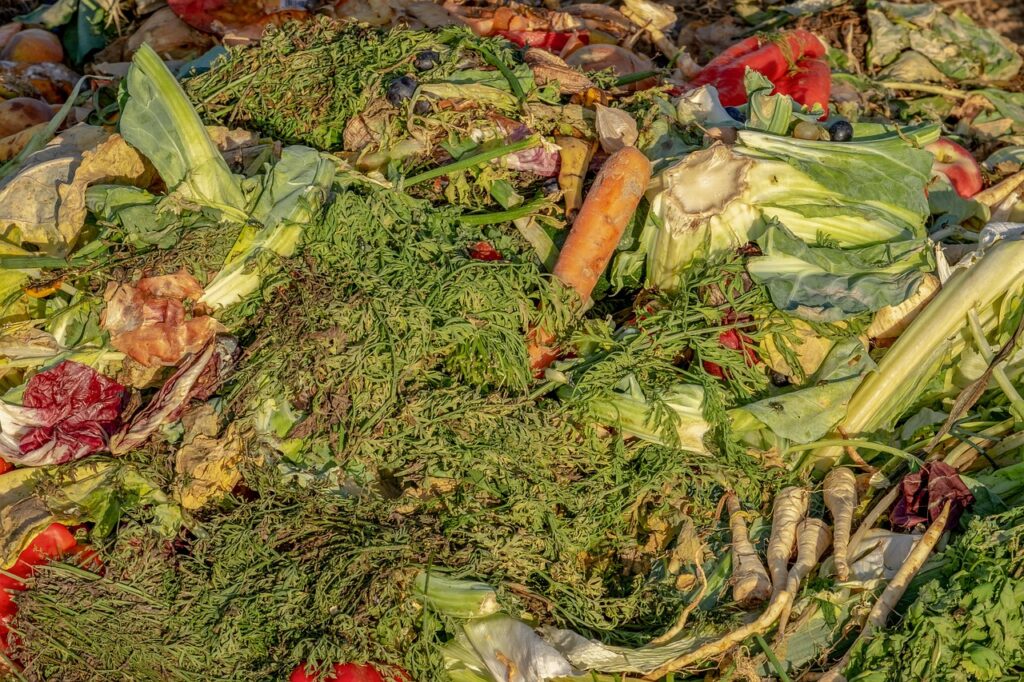
Green materials to add to your compost heap include:
- Fresh vegetable and fruit scraps
- Green grass clippings
- Garden and indoor plant trimmings
- Eggshells
- Coffee grounds and tea bags
- Animal droppings
Starting the Compost

Now that you’ve rounded up your materials, you can decide how you want to compost them!
There are two ways to make compost: the cold method and the hot method.
Both will result in an equally excellent end-product, but there are important differences between the two that will help you decide which one works best for you!
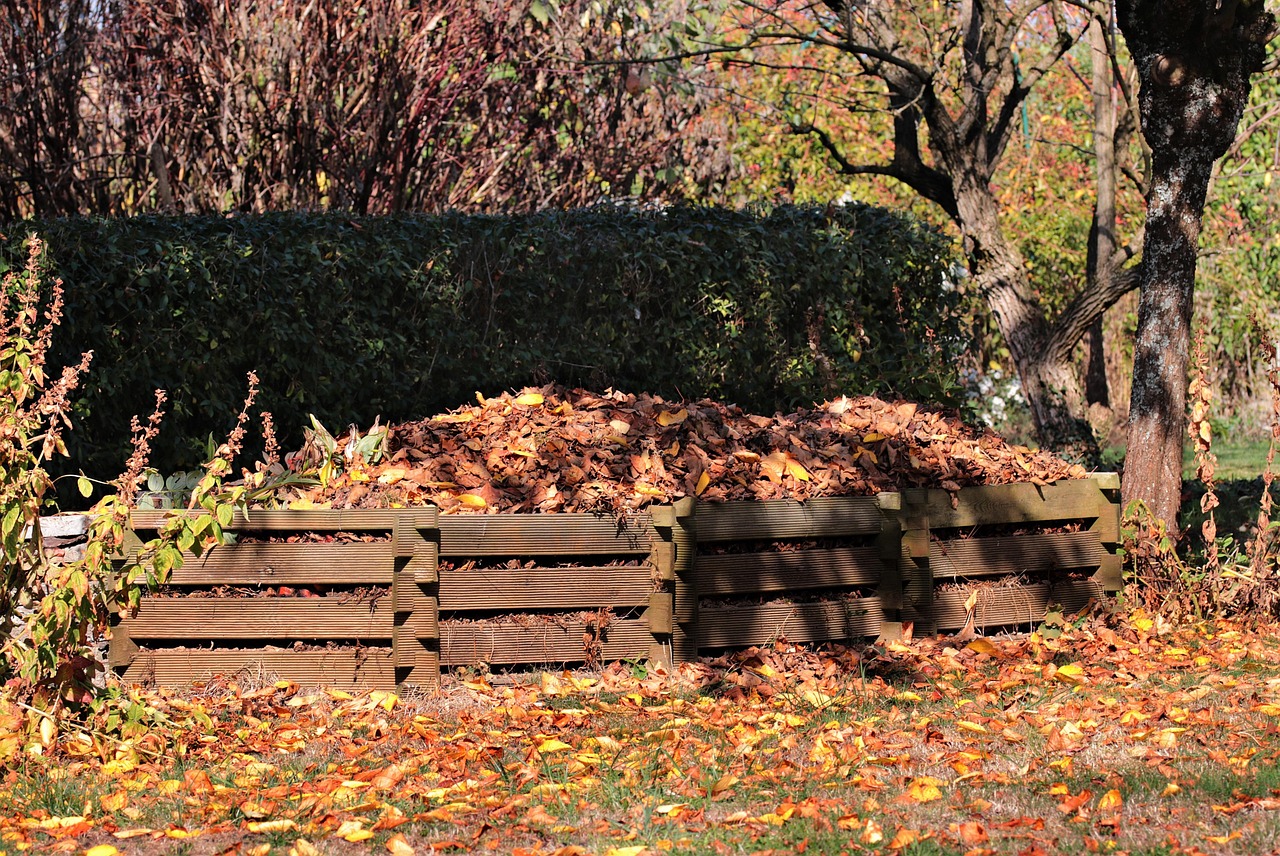
Cold Composting
Cold composting is a simple method that takes less work, less attention, and less know-how, but takes the most time.
It’s sometimes known as “lazy” composting, because you simply throw all of your materials together in a heap, wet it down, and leave it alone to break down at its own pace.
It’s important to note that even if this is not an active, labor-intensive way to make compost, it still serves the *very important* purpose of changing organic material that is usually thrown away as waste into a powerhouse of nutrition for our gardens.
Thankfully, we can easily start a scrap container in the kitchen that gets emptied onto the heap when it’s full, or to set aside where plant clippings and tree limbs are piled together to compost naturally over time. Much better than sending to a landfill to rot or burn!!
In a cold compost pile, it helps to mix in plenty of bulky browns like twigs and branches, in order to create air spaces that allow enough oxygen for healthy microbial activity. Too little oxygen (or not enough brown material) will cause the pile to rot into a slimy, smelly heap. So, be sure to add plenty of browns when cold composting.
In most climates, a cold compost heap will transform into a rich, ready-to-use pile of compost in 8 to 12 months!
Hot Composting
Hot composting is the more labor-intensive, and process-dependent way of composting… but it works very fast!
Hot composting gets its name from the heat produced while the pile is breaking down. As microbes digest the organic materials, they break the chemical bonds in the molecules releasing that energy in the form of heat.
Hot compost piles will warm up to internal temperatures of 130°F to 160°F (54°C to 71°C) as they work.
This is really helpful to us making our own compost because the high temperatures kill unwanted things in the pile like weed/grass seeds and pathogens that we don’t want to put in our gardens.
The warmth also dramatically speeds up the breakdown of the pile compared to cold composting — most hot compost piles are ready to use in about one to two months!
To hot compost successfully, you need to be intentional in how you build and manage your pile.
How to Build a Hot Compost Pile
Hot compost piles are built in layers. These layers eventually get mixed together, but to start, the layers help you keep on top of the ratios of browns/greens and allow the microbial action to start evenly through the whole pile.
To build the foundation of the pile, make a thick layer of browns. Use broken up sticks and leaves, ripped up brown cardboard, and anything else that will help support the pile and allow air to flow a little bit.
Now add a layer of greens. This layer needs to be pretty thin — a couple of inches thick at most.
Add another thick layer of browns on top of the greens.
Repeat this layering of thick browns and thin greens until you’ve used up all of your material or have filled your composting container. If you’re not using a compost container, you’ll want a pile that’s at least 3ft tall and 3ft wide.
Now wet the whole pile with water until it’s nicely damp. You don’t want to completely saturate the heap, but damp like a squeezed-out sponge is perfect!
Water and Oxygen: Two Key Ingredients for Hot Composting Systems
Besides the nutrients and energy from the raw materials you pile up, microorganisms in a compost heap need oxygen and water to survive.
This applies to both cold and hot composting, but when you actively provide and manage these things, you can make the composting process go a whole lot faster!
Now, at this point, you already have stacked your compost pile, and it’s wet enough to start working.
Going forward, your first goal is to make sure that it stays moist enough — air will dry the pile, heat will dry it faster, and the microorganisms will “drink” the water, too.
Your second goal will be to keep plenty of fresh air flowing in the pile.
Some people add large, bulky browns throughout the pile to allow plenty of air space. Sometimes, hollow tubes are pushed into the pile to allow air in. Both of these ideas, and any others you may have, will work well…
But the most common and effective way to aerate a hot compost pile is to turn it manually.
Turning a compost pile offers three main advantages:
- You cycle the raw material on the outside of the pile in toward the center where the most microbial activity is happening, which makes the composting process happen as fast as possible.
- You ensure there’s plenty of fresh oxygen in your compost pile.
- You can keep a close eye on the moisture level, and add more water if it’s starting to get too dry.
If you’re turning your compost, usually every few days to once a week is a good schedule to go by.
Some people with very active compost piles might decide on an intensive turning schedule and turn it daily (but this is a lot of work and may not be needed.)
How to Tell When Your Compost is Ready to Use
In a cold composting pile, almost all of your raw material will be gone, and in its place will be rich, spongy, brown compost. It should smell fresh and earthy, and be pleasantly moist and springy to the touch.
In a hot composting system, the compost will be brown, spongy, and damp with little-to-no raw material left. Also, you’ll know that your hot compost pile is fully broken down and ready to use when it stops putting off heat.
(When you buy a load of hot compost, it’s often still working and will need to rest for a week or two to finish before you put it on the garden because the heat can easily cook seeds before they germinate or kill living plants!!)
Tips for Composting Success

1) Use a Container
It is perfectly fine and effective if your compost pile is just that: a pile… tucked into an out-of-the way location outside. These are easy to turn, easy to add to, and easy to take care of.
But, lots of people choose to contain their pile in one way or another…
A contained pile stays in its form so that the microorganisms working in it are able to do their work consistently without disturbance until you’re ready to turn it.
Water and air dispersion is consistent and even.
And (very helpfully) animals cannot dig into the pile looking for scraps…
In short, the pile stays a pile, in its place, until you decide otherwise!
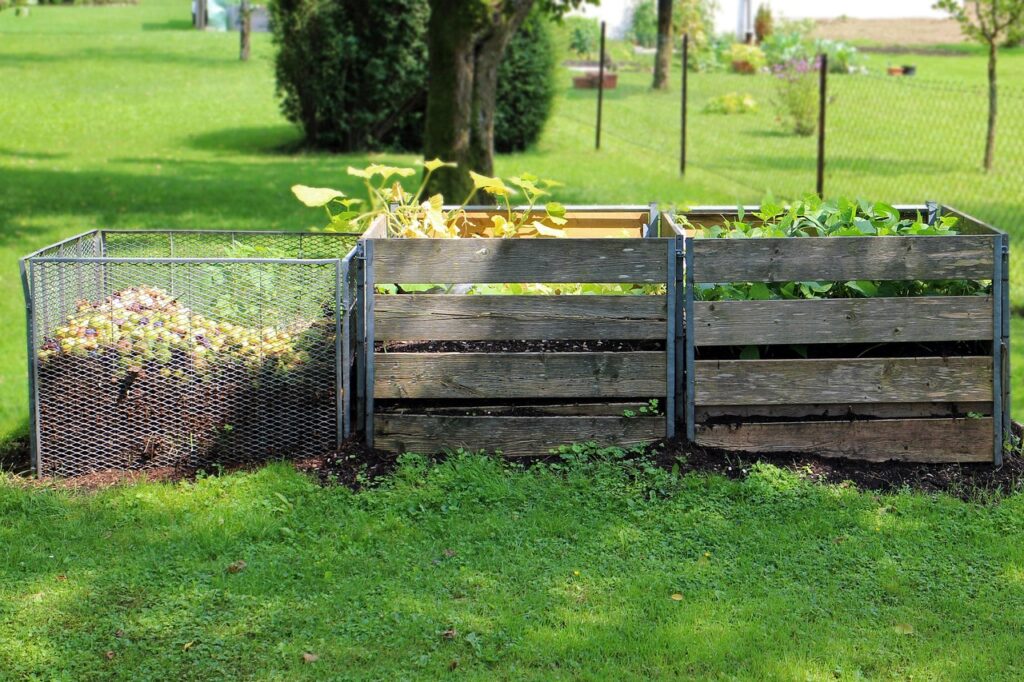
Happily, it’s easy to build a simple DIY compost container.
Recycled, untreated pallets connected together into a cube work really well for this! The contained area is perfect to have an average/good-sized compost pile, with plenty of space for you to turn the pile or to add bulkier items like broken up tree limbs.
DIY Pallet Composting Bin Video
Another basic, easy container option is to use a large-gauge wire mesh fencing to create a circular enclosure. It can be made to any size you need, and once it’s made, just use a metal or wooden stake to anchor it into the ground so it doesn’t fall over. This type of container works really well for cold compost heaps because it’s more difficult to open up in order to turn the pile — but it can be done if that’s what works for you!
There are also some awesome composting containers that you can buy for easy set-up and use in a range of situations.
(As an Amazon Associate, I earn from qualifying purchases.) Additionally, I am not a doctor or health physician, and the advice given here should not be used in place of professional medical advice. Please do your own research.
Some are outdoor containers that would go in the yard. Others are designed to be used on a porch or patio.
Others are in-house composting systems that you can set up right in your kitchen!
Really take the time to think about what type of container would work best for your personal situation, and build or buy whatever you need!
2) Shred Your Raw Materials
It’s really, really helpful if your raw organic materials are in small pieces before you add them to your compost pile. It takes a little bit more time, but not that much. You don’t need to invest too much thought or effort into this… just chunk up large pieces of raw material and mix everything so the textures stay pretty balanced in the pile.
Some of the great reasons to use finely-shredded raw materials include:
Smaller pieces mean faster composting.
When you shred up your raw materials, this exposes much more surface area for microorganisms to work on. Therefore, the material breaks down into compost a much quicker.
Compost is easier to turn.
When you’re turning a compost pile (generally a hot pile, but cold ones can be turned occasionally, too) it’s much simpler to mix together when the pieces are small and roughly uniform in size. This is easier on you, the pile turner, and means you get a more even distribution of the material throughout the pile.
It’s easier for water and air to evenly disburse through the pile.
You want your compost piles to be pretty evenly moist and oxygenated. You don’t want overly dry or soggy areas, as both will prevent the organic material from composting well or evenly. When things are in roughly the same small-ish sized bits, the water and air can spread through the pile evenly.
When you shred your raw materials, just use common sense and try to keep things about the same size.
The smaller the material, the faster it breaks down.
For example, cardboard can be ripped up into 1-2 inch pieces. Wood can be chipped up or broken into small chunks. Corn cobbs and stalks, and other garden left-overs can be chopped into smaller chunks or sections. Crush up eggshells. Chop up bulky cabbage heads, whole carrots or potatoes, and other large chunky vegetables…
Hay, grass clippings, dried leaves, anything that’s naturally finer can usually be piled onto the pile as-is. You might decide to chop them up a little bit so they don’t mat down (especially leaves) but these items are really great for adding tons of surface area to your pile without needing too much work beforehand.
Just try to give the microbes in your pile more surface area to work on without adding too much time or effort on your end.
3) Insulate Your Compost
When you insulate your compost pile, it helps maintain an even environment within the pile. If your pile is a hot compost pile, it will also help hold in the heat, which helps the microbes work faster and better as they break down the organic materials.
Good ways to insulate your pile are pretty basic.
- Cover your pile with a tarp, wrap it in a couple of layers of burlap, or even use cardboard or plywood.
- Pile straw or hay around the pile.
- Buy a compost insulating wrap to wrap around your pile or compost container.
- (As an Amazon Associate, I earn from qualifying purchases.) Additionally, I am not a doctor or health physician, and the advice given here should not be used in place of professional medical advice. Please do your own research.
Should I Cover My Compost?
While we’re talking about insulating the compost pile, it’s a good time to discuss covering the pile, too.
If you’ve got a lot of wet, rainy, soggy weather, it might be a good idea to cover your compost pile. A saturated pile has less chance of getting plenty of oxygen all the way through it as it should, so do protect the pile from overwatering.
This is also true if you live in areas of extreme hot or cold. If it’s very hot, you might risk the pile drying out or overheating. If it’s cold, microbial life will naturally slow down anyway, but covering the pile can help insulate it if you’d like to get an early start on the growing season or to extend your compost’s activity longer after the growing season starts to close down.
You also will probably decide to cover your pile if you live in an area with lots of wildlife that might get into your pile searching for food. If you notice signs of digging or scattering your pile, or if you know you have feral/stray cats or dogs, raccoons, rats, bears, or other mammals that might see your compost pile as a nightly buffet, then cover it in an animal proof covering, just in case.
Options for covers are the same for insulation: tarps or shade cloth, wire, cardboard or plywood… just use what you have if you have a DIY setup, and if you’re using a container you’ve purchased, be sure to use the lid if you need to!
4) Encourage Helpers, Discourage Pests
You know that mammals will dig into your compost if they’re hungry or like the smell of your compost pile… but lots of people have questions about visitors of the insect variety that will definitely investigate (and move into) a compost pile, too.
A hot compost pile might not be as prone to insect issues because the heat will just be too hot for many things to be comfortable, and a hot compost pile will also break down the organic matter they’re seeking pretty quickly. Regular turning will interrupt the life cycles of many insects that might seek your piles as a habitat, too.
There are many, many types of invertebrates that you might see in your pile. Let’s talk about a few of them.
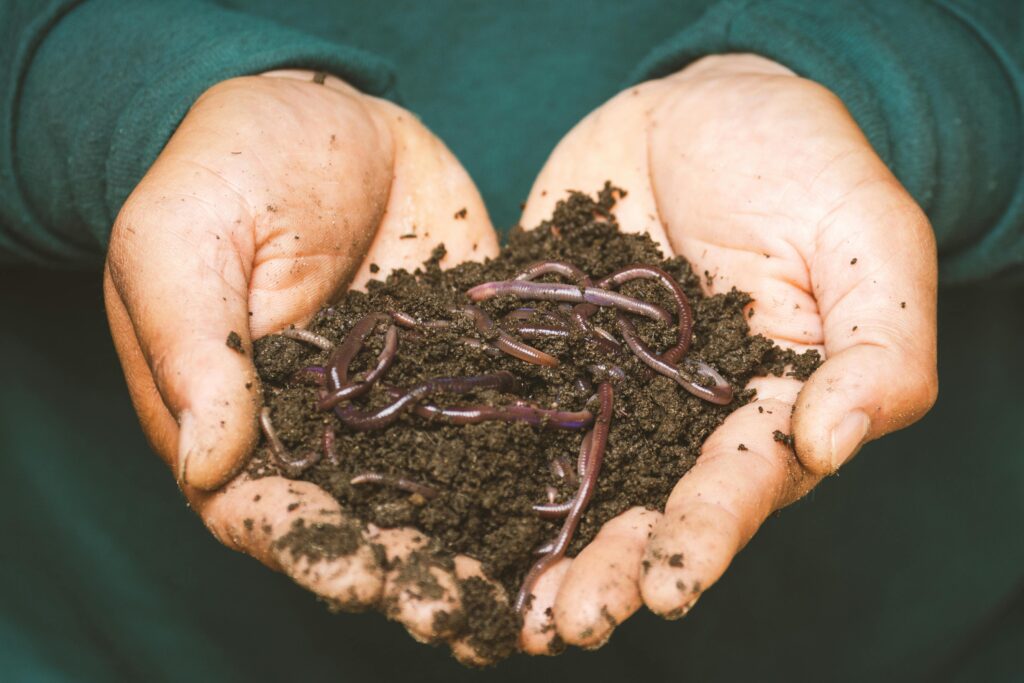
Earthworms
Earthworms are very, very welcome in a compost pile. For one thing, the pile offers them an ideal place to live, so seeing them is almost inevitable. But also, worms eat decaying organic material… Their droppings are extremely, incredibly nutrient-rich and organic gardeners will pay pretty prices to buy worm castings for their gardens. These free, nutrient concentrating, fast composting residents are great companions in your compost, and also a good sign that your compost is healthy and toxin-free!
Grubs
Many species of beetles will lay their eggs in decaying organic matter, and they view a compost heap as an ideal incubator. When the eggs hatch, the beetle larvae, or grubs, then live in the pile until they’re ready to pupate (transform into adult beetles). Grubs really aren’t a problem in your compost pile, but they may become a problem if they are moved into your garden because some types of grubs will eat the roots of plants, killing them from below before you realize they’re there. If you find grubs in your compost try to identify them and decide if they’re welcome to stay or not.
Ants
Ants are also frequent visitors to a compost pile. When they find a steady source of food, they will create a nonstop stream of workers to carry the food back to their nest, or they’ll happily start a new nest inside or right beside the source. A compost heap is an ideal new home for ants… It’s really up to you if you decide to tolerate them and share the food source (your scraps) with them, or if you want to deter or kill them. It’s tempting to kill them on the simple basis that they’re ants, but do consider the kind of ant you’re dealing with, and find out if they’re beneficial to your local ecosystem before you decide to go scorched-earth on them.
Flies
There are many kinds of flies that may be attracted to your compost pile. Though we humans are generally very annoyed by flies, the fact is, their larvae (maggots) need decaying material to eat in order to survive. If you see flies around your pile and you don’t like it, you might have too much water in your pile causing rot. Or, you might want to make sure you bury fresh material down into the pile so that it’s not openly available and attractive to the flies.
The important thing to remember when you decide to start composting is that by its very nature, other decomposers in the ecosystem will be drawn right to it to do their job as the eco-cleaning crew and to feed themselves or complete their reproductive cycles.
This is normal, natural, and you need not be too distressed or territorial about your compost pile. And remember, these visitors are usually doing the good work of breaking down the organic material, so they very well may be welcome.
The best thing to do when you find insects/invertebrates visiting or moving in is to do your research! Find out what you’re looking at, what its function is — both in the pile and in the wider ecosystem — and decide if you need to make any changes to how you manage your compost pile in order to deter (or encourage!) their visits.
5) Only Use Natural Materials
This might seem to go without saying, but I think it’s important enough specifically mention.
Whatever you add to your compost (and there are lots and lots of things that will break down that you might not think of at first) you don’t want to add synthetic chemicals or plastics to your pile. You also don’t want to add metals, unless they’re small enough to rust away fairly quickly.
Synthetic chemicals can be poisonous for the environment, and creatures (including yourself and your family) living in it. Gardens and soil are not sterile. They have billions of tiny microorganisms, fungi, bacteria, and microscopic interactions going on that need to survive and thrive. These are not germs… they ARE life. Don’t kill the life in the soil, by accident or on purpose, in your quest to make compost or to interact with the outside world.
Similarly, plastic is another huge no-no for the environment and life living in it. Plastics do not deteriorate, they just disintegrate. This means that no matter how small the particles get, they are still plastic. They do not biodegrade but instead get integrated into life chains as plastic particles, releasing harmful chemicals that act as poisons in the bodies of living things along the way.
So, when you’re deciding if you want to compost something, take a moment to research what is in it, and if it can be broken down by natural methods. If it can’t be broken down, learn what impacts it’ll have on the life forms around it, and decide if you want to put it in your compost pile or not.
For example, it’s questionable to add plastic laminated cardboard to your pile, but brown cardboard with the tape and stickers removed is generally encouraged… but, it still may have some printing on it. The ink that’s printed on the cardboard is unlikely to be eco-friendly, but it’s still usually worth it to compost the printed brown cardboard, rather than burn it or put it into the trash.
In this, we just have to use our best judgement while also recognizing that our world is polluted on nearly every level, and keep pushing for positive change while doing our own small part. That’s the best we can do!
Other Additions to Your Compost
Anything organic can be composted… but different things may have different requirements or get a little bit “nasty” as they break down. That’s why most people usually try to only compost plant-based organic material.
But there are a few things that you may decide to compost, if you’re aware that you can, and how to do it.
Wood Ashes
If you burn wood fires, you’ll need to clean out the ashes every so often. And a great place to scatter the ashes is your compost heap… but, you don’t want to overdo it because too many ashes will kill the microbes in your pile. That said, some wood ashes are a great addition to the pile because they add nutrients, especially potassium and phosphorus, to the pile — along with several micronutrients, as well.
They also help to add great texture to the pile, absorbing water, creating airspaces and keeping the pile from becoming compacted and slimy. If you have wood ashes available, sprinkle a few handfuls on your pile when you turn it (or just in passing if you aren’t turning it). Spread any leftovers around the yard or across your garden!
Generally, wood ashes would fall into the “browns” category.
Meat and Animal Fats
Some composting information presents adding meat and fats to your pile as a huge no-no… but the truth is, you can absolutely compost animal meat and fat/grease scraps.
There are many carnivorous and omnivorous insects that will happily help consume and digest these types of organic materials… So, at the very least, these nitrogen-rich materials will provide nutrition to the microorganisms that are living and working in the compost pile. Also, the meat itself will break down into usable compost!
To add meat or fat to your pile and have it compost successfully, follow a few best practices:
- Meat is best in a hot compost. The hot compost will kill any/all disease-causing bacteria that grow on meats (like E. coli or salmonella).
- Meat is a “green” material, so be sure to mix it with plenty of browns so the balance of nitrogen/carbon is maintained and the composting happens properly, instead of rotting.
- Bury the meat pretty deep so that animals and insects aren’t drawn to your pile, and to keep any yucky smells under control (another reason for lots of browns).
- Shred/finely chop the meat and mix into the pile well. This way the meat composts as quickly as possible and doesn’t begin to rot in big chunks.
- Don’t add too much meat or fat/grease at a time. This comes back to the browns/greens ratio and balance, but if you’re adding animal products to an established pile, adding a bunch of nitrogen-rich meat will throw that balance off for the whole pile.
Animal Hair or Feathers
Similar to meat and fats, lots of people might not consider that hair and feathers will compost just fine, too. They actually compost very well, and are suitable for both a hot or cold compost pile.
These all fall into the “green” category, so be sure to add plenty of browns to balance out the compost pile.
This is a rarer situation, but people who raise animals for their fleeces will have a great deal of unusable material that can go straight into the compost pile! The same is true of self-employed hairdressers, too. And the same goes for people with an excess of feathers, as well!
Anything Else That Is Made of Natural, Non-toxic Material
There are tons of things (literally) that you might not think of as compostable and toss it into the trash… where it will end up in a landfill to rot. As we know, rot is the stinky second cousin to composting, so let’s avoid that in any way possible!!
For some really great ideas, here is an awesome article listing 30 things you might not realize can be composted!
The point I’m trying to make is that there are SO MANY THINGS that we throw away in the garbage without really stopping to consider if it could be tossed in the compost instead. It’s not a bad thing, just a habit… and habits can change!
If you aren’t sure about something, but you suspect it might be compostable, look it up! And if it’s a good composting candidate, throw it into a hot compost and see what results you get. As long as we’re turning waste into nutrient-rich, usable compost instead of filling landfills items that ultimately pollute the Earth, we’re working together in the right direction!!
I hope you’ve found this composting post as informative and empowering as I did as I researched and wrote it!
Composting is a vast and engaging topic, and I know there’s so much more that could be added here.
If you know of any useful tips or info, opinions on different composting bins, and any other valuable info that I missed, I’d so appreciate it if you’d drop a comment here!
Thanks so much for being part of the community who cares, and I can’t wait to hear all about your own composting successes!!
Cheers, love and happy composting!!
Cariel <3
Leave a Reply