

It’s almost time to start our gardens here in the Northern Hemisphere! But… starting a garden, especially an herb garden, means that we need to have a plan for how we’re going to preserve our herbs!
First, we want to make sure that all of the love, care, effort, and resources we pour into our gardens isn’t wasted or ruined so that we can enjoy their loveliness and healing strength throughout the cold seasons.
Also, as the herbs in our garden grow, many of them need to be harvested before they begin to flower or set seeds.
Others, we’re looking to gather the seeds either for their use in our kitchen and home apothecaries, or because we want to save and sprout the seeds next year…
Further, what if we need to harvest and store the roots of a plant? We want to be sure that there’s enough available for us to harvest and still have enough to grow another good crop next year.
Starting out garden with the end game in mind really, really helps to guide us in our plan for what to grow, how much to grow, and how to set up our storage area!
Thankfully, this end game is very simple, low-tech, and forgiving, even if you’ve never done it before. All you’ll need is fresh herbs, basic equipment, space, and a plan!
(As an Amazon Associate, I earn from qualifying purchases.) Additionally, I am not a doctor or health physician, and the advice given here should not be used in place of professional medical advice. Please do your own research.
Step 1: Drying Your Herbs
When cooking or making teas or medicines you’ll use immediately, fresh herbs are often preferrable.
But when putting herbs up for long term storage or to make infused oils, you need to dry them first to keep mold and bacteria from growing… This means that drying your herbs is almost always step one in herb preservation!
There are a few ways to dry herbs: air drying, oven drying, using a dehydrator, and freeze drying.
The method you choose depends on a few factors. You’ll want to consider the size, thickness, and body of the plant parts you’re drying, what tools and materials you have on hand, and how you plan to use the herbs in the future.
You’ll also want to decide if you need to cut or grind anything you’re drying, and if you want to do that before or after its dried.
You can also decide to play around with your process and see what works best for you based on what you’re drying and what tools or limitations or preferences you may have to work with.
To help you sort all of this out, let’s go over the basics.
Air Drying
(As an Amazon Associate, I earn from qualifying purchases.) Additionally, I am not a doctor or health physician, and the advice given here should not be used in place of professional medical advice. Please do your own research.
When it comes to drying anything, it doesn’t get more basic that simply drying something in the air around it.
However, don’t be fooled by the simplicity of this process!
People have used air drying to preserve their food for thousands of years, and often it allows for the slow curing of some herbs and flowers that prevents the harsh chlorophyll taste that develops from faster drying methods — especially the ones that use heat.
In fact, air drying herbs is really the best way for some things, like tough roots and barks, because they need the long, slow cure time. Electric is (by far!) not always the best way to go in holistic healing.
To air dry herbs you need two basic things: a space that the herbs can stay for an extended period of time, and a way to keep them there. The space you use needs to be reasonably cool, well ventilated, out of direct bright light or sunlight, and reasonably pest/pet/little people free.
If you want to, you can also use a fan to keep the air circulating, which will carry away moisture and help prevent mold and mildew. Just don’t aim it directly at your herbs at a close distance or they will blow away as they dry out!
Warning! You home or drying area will smell heavenly!! <3
Here are some simple ways to air dry herbs.
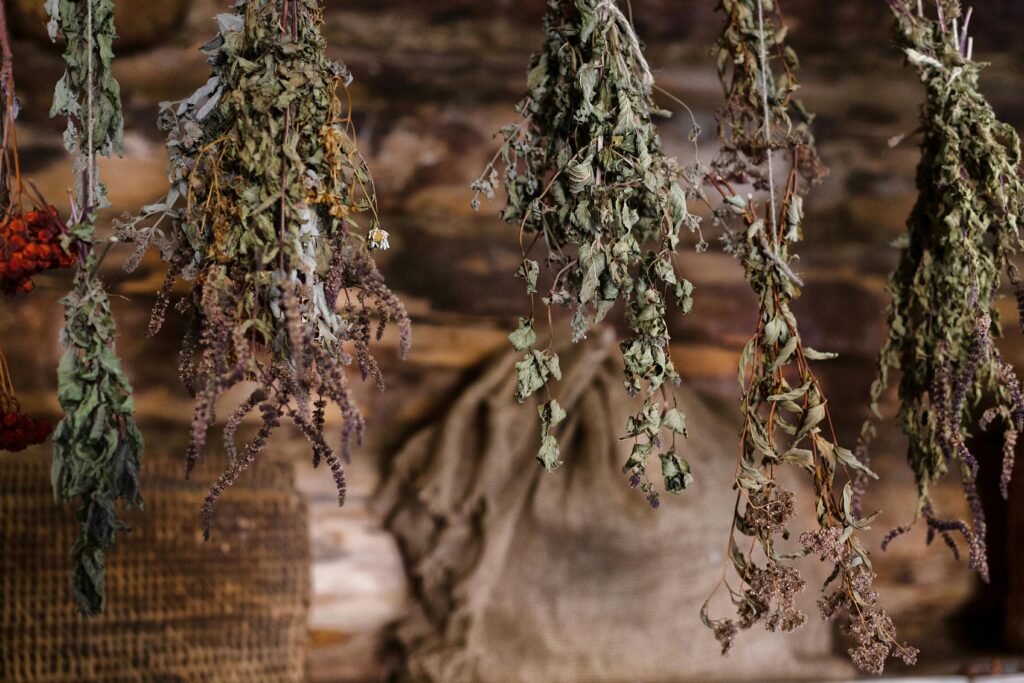
Hang Herbs to Dry in Open Air
(As an Amazon Associate, I earn from qualifying purchases.) Additionally, I am not a doctor or health physician, and the advice given here should not be used in place of professional medical advice. Please do your own research.
Hanging herbs to dry is a fantastic way to dry whole plants, or long stems with the leaves and flowers still attached.
To hang herbs to dry, simply harvest the herbs in pieces long enough to be tied together, then wrap a long string around them, starting at the bottom, and wrapping it a few times loosely to the top of the stems and then going back down to finish at the bottom. This way you have a nice bundle – just make sure it’s loose enough to allow air to move inside the bundle so it doesn’t mold.
Tie the string in a loop and hang the bundle upside down on a nail or tack high in the drying area. Hang until dry.
A variation of this technique is drying your herbs in a bag.
It’s very simple. Just tuck the herbs into muslin drawstring bags or loosely wrap them in a non-synthetic cloth like cotton or hemp to hang and dry. You can also use brown paper bags for this.
It’s a good idea – but strictly necessary – because the cloth absorbs any excess moisture, captures any dry plant material that falls off the stems, and keeps bugs and dust from landing on the drying herbs.
If you’d like to dry your herbs in cloth, put them in the bags or wrap them very loosely, with the top of the plants pointed down, and close or tie the bags around the stems. Hang upside down to dry.

For bulbed herbs that have long, strong greens, such as onions or garlic, the traditional method is to braid the green tops together, adding each new bulb with each braid-over, until you use all of the bulbs you’ve pulled or until you have a strand 3-6 feet long. Use a piece of string to tie off the end and hang to dry and cure the bulbs. Just cut or break off what you need, as you need them.
Air Dry Herbs on Drying Racks
(As an Amazon Associate, I earn from qualifying purchases.) Additionally, I am not a doctor or health physician, and the advice given here should not be used in place of professional medical advice. Please do your own research.
This is the other most common way to dry herbs in the air, especially if the material is small, thin, easy to scatter out, or isn’t attached to the stems… think flowers or leaves you’ve picked from the living plant and brought in to dry.
Drying racks can be made of any nonreactive material. Some great options are wide, shallow drying baskets made of wood, repurposed window screens, or herb drying racks that you buy for this purpose.
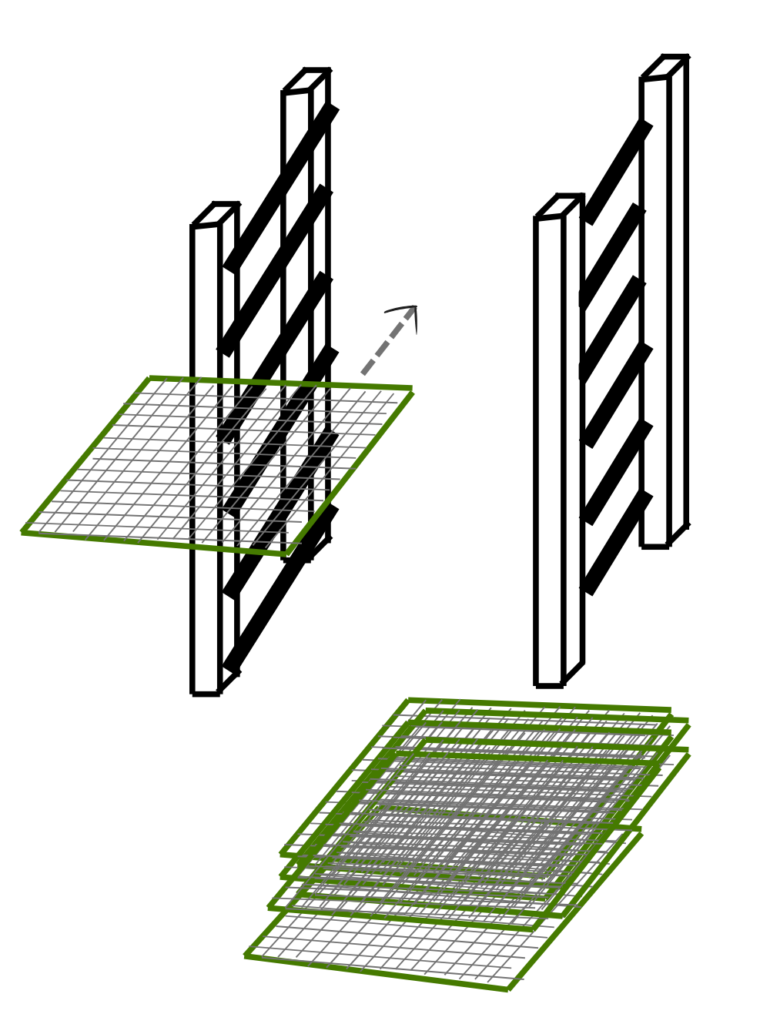
Make A Homemade Drying Rack Frame
A great DIY drying system is to make a wooden frame, about shoulder-height and wide enough to fit the screens you’ll use. It’s also a good idea to put screening around the outside of the frame, and across the top and bottom to keep pests out while herbs are drying inside. Attach strips attached every 4-6 inches apart from the bottom to the top. You can also add wheels on the bottom, if you wish! Then just slide your racks into the frame as you need them.
To dry herbs on drying racks, just spread your herbs out in a single layer with enough space between the material to let air flow freely, and let them dry. Do not pile the herb material up on top of itself or overcrowd your racks because the herbs will mold quickly if you do.
It’s a good idea to move the drying herbs around at least once a day, or more often if you think they need it, to expose all parts to the air so that they can dry completely.
Fun Tip: My Mama had a great suggestion for drying herbs that came up in a conversation about making sun dried tomatoes… She advised I lay my racks out in the car to dry, thanks to its warm, pest-free interior. If you don’t want your car to smell like dried herbs, no worries! But, do be willing to be creative with your drying station, if you need to!
Oven Drying Herbs
(As an Amazon Associate, I earn from qualifying purchases.) Additionally, I am not a doctor or health physician, and the advice given here should not be used in place of professional medical advice. Please do your own research.
This is my least-favorite way to dry herbs, and I usually only use it in a pinch… but it does work quickly and is effective.
To dry herbs in an oven, set your oven to the lowest possible temperature that you can. Spread your herb material out on a sheet pan or oven-safe baking rack in a single layer. Let cook until dry. Be sure to rotate and fluff the herbs often so that they dry evenly. Take out the herbs as they dry because they will burn in the oven.
There are a couple of major drawbacks to drying herbs in the oven.
First, obviously, it’s frustratingly easy to burn and ruin herbs in an oven. Watch them carefully if you need to use this method.
Second, the high heat will break down the flavor and medicinal compounds in the herbs. It’s close to impossible to have a consistently “cool” oven temperature, as many ovens will still be a bit too warm at their coolest setting. If you are oven drying herbs, get them out as soon as they’re dry enough!
Third, fast drying plants of any kind in a warm environment causes them to develop a harsh chlorophyll flavor that really isn’t that great.
Really, the best thing about using an oven to dry herbs is the speed. Use this method if you need the herbs dried today, and you don’t have a dehydrator.
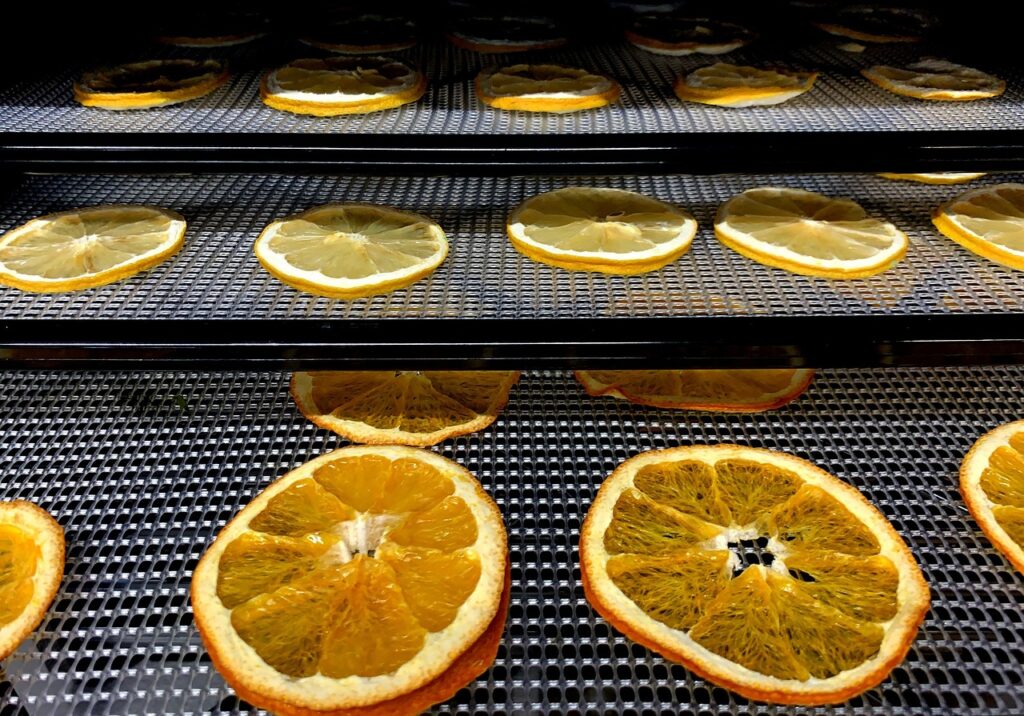
Drying Herbs in a Dehydrator
(As an Amazon Associate, I earn from qualifying purchases.) Additionally, I am not a doctor or health physician, and the advice given here should not be used in place of professional medical advice. Please do your own research.
A dehydrator is a very reliable way to dry your herbs, and lots of people choose this as their absolute go-to method.
A dehydrator is a machine that is made of drying racks that stack together or fit into the drying chamber, a heater that can be set to very low temperatures, and a fan that blows constantly. It’s a very smart set up because you can dehydrate (dry) basically any food in it and get safe, consistent, reliable results.
In the grand scheme, dehydrators are relatively inexpensive, and they dry foods quickly – herbs can be completely dry in just a few hours – without degrading or sacrificing the nutrients very much at all!
Dehydrators also come with instructions that will give you all the information you need, such as how full to load the machine, what temperature setting to use, and approximately how much time it will take for your material to dry completely.
In general, you’ll want to follow some basic, common sense guidelines like allowing air space between the material, and not to combine herbs with strong flavors or scents with more gentle ones (for example, hot peppers or garlic and onions are usually dried by themselves in the dehydrator).
It is possible to over-dry your herbs in a dehydrator, too. Get them out when they will break if you try to bend them, but avoid drying them to the point where they turn to powder in your hand.
If you’re willing and able to invest a little bit in your herb drying endeavors, a dehydrator is an awesome tool that will last for years and pay for itself very quickly!
Drying Herbs in a Freeze Dryer

(As an Amazon Associate, I earn from qualifying purchases.) Additionally, I am not a doctor or health physician, and the advice given here should not be used in place of professional medical advice. Please do your own research.
Freeze drying is the crowning jewel of electricity-assisted herb preservation! Only in the last few years have affordable home freeze dryers come on the scene.
Freeze dryers are pretty fancy, as far as food preservation goes, but they are top-notch when it comes to protecting the integrity of the medicinal and flavor compounds in the food. And… they work wonderfully for herbs!!
Incredibly, freeze dried foods can last up to three years without compromising their flavor or nutritional benefits at all!!
Freeze dryers work by first freezing the material you put in them, and then via a process called sublimation, the water in its frozen form is transformed to vapor without the ice melting to the liquid state in-between. (This is done by carefully regulating the temperature and pressure inside the machine.)
The vapor is then exhausted from chamber, drying the material without using the typical liquid-to-vapor process.
Freeze dryers can easily be very expensive, but some tabletop versions are very reasonably priced! And they really are incredibly wonderful, top-shelf food preservation machines.
If you’re really serious about getting the best dried version of your herbs, and if you think it’s an investment that you’ll use enough to justify the purchase, get a freeze dryer and enjoy years’ worth of high-quality dried herbs!
How to Store Dried Herbs at Peak Quality Over Time

(As an Amazon Associate, I earn from qualifying purchases.) Additionally, I am not a doctor or health physician, and the advice given here should not be used in place of professional medical advice. Please do your own research.
Now that you’ve dried your herbs, you want them to stay in great shape for a long while – at least until the next growing season!
You want them to stay dried, with good color and quality, without molding or spoiling or losing their oomph!
Thankfully this is easy!
All you need to do is put your clean, dried herbs into a clean, dry container that won’t let excessive moisture build up inside. Also, it’s best to keep your herbs in a cupboard or cabinet where they won’t be exposed to strong light or heat.
I recommend using clean, totally dry glass mason jars with clean, dry lids. Paper storage bags are also a good choice. The herbs will last longer in the glass jar, but the paper bag will absorb moisture and block light.
If you decide to store your herbs in a glass jar, you can put a piece of clean cotton, hemp, or linen cloth over the jar before you put the lid on. This will work to absorb the moisture in the air or any moisture still left in the herbs.
(You can also use a silica packet for this same purpose, if you’d rather. Most people don’t want, need, or use the silica packets in their herbs, though.)
Also, dried herbs will stay good and useful for a long time, even when stored in less-than-perfect conditions.
Unless they show signs of mold or spoilage, their potency will degrade slowly over time. It is not a fast or sudden situation. Even herbs that have lost their color can still have flavor and medicinal value.
All of that said, to keep you herbs at peak quality for the long term, store them the best you can, keep the lid on or the bag closed, and watch for signs that they’re reaching the end of their shelf life – such as mold or funky smells or textures. (Also, keep an eye out for pantry moths. If you see what appear to be cobwebs clumped in your herbs, or little larvae, then you have a moth invasion.)
In good storage, though, your hard work will be rewarded by high-quality, home grown herbs that last up to two years (or more!) before needing to be replaced.
So, Friends, do you feel confident drying and storing your own herbs? I so, so hope so, because it is pretty straightforward, no matter which way(s) you go about it, and I hope you’re well on your way to having all of the herbs you’ll want or need to keep yourself and your loved ones healthy!
I also hope that you’re already whiffing the delightful scents of drying herbs in your home, and that you’re having a fantastic time on your journey of natural living!! It is so good. <3
If there’s anything else you’d like to know, or if you have any of your own tips or tricks to share about preserving and storing herbs, drop a comment below!!
To all of our best lives and health!!
Love,
Cariel
Leave a Reply